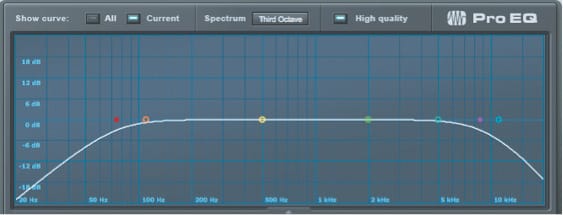
Figure 1: Also known as the EQ frown.
Easy post-production tips for the music educator
Professionally-recorded audio goes through extensive post-production editing in order to provide the best sound possible. This article provides simple tips that any musician can use to edit a school recording.
Back It Up

Figure 2
The first thing you must do before starting to edit is save a duplicate of your file to a backup drive. Ensure that the duplicate is the entire song or project folder, not just the audio editor file. Audio programs store the actual .wav sound files in separate folder, so you must save an entire new version as a back up.
Listening
When editing a recording, it is imperative that you listen using quality studio monitors. Commercial speakers can alter the audio, and if you are to properly EQ a recording you must be able to hear it back using near-field monitors that are completely flat, meaning they do not boost or cut any frequencies.
Equalization

Figure 3
EQ adjustment is usually necessary to account for the acoustic anomalies of a room. I strongly suggest using EQ only for taking out unwanted frequencies, and not to try to repair ensemble balance or timbre. When EQing it is important to always listen carefully for the spot where the unwanted room noise goes away, but where the ensemble timbre does not change. You will not be able to remove all of an unwanted sound, so always be careful not to get too “EQ happy” and affect your ensemble sound.

Figure 4
The second EQ I do is to identify where the room resonates. Rooms are just like instruments and there are frequencies where they resonate louder. The best way to identify this is to boost your EQ curve very high and narrow, and slowly sweep left to right while listening to your recording, see Figure 2. The most resonate frequencies will jump out at you, at which point you will cut that frequency up to 6db. In this step, it is crucial that you make an adjustment with your ears. On the sweep you are listening for a specific frequency to jump out at you. When cutting that frequency, adjust your listening to the entire ensemble and focus on overall clarity, meaning you want to cut just the amount of the frequency that the room has added, without cutting the amount of the frequency your ensemble produced. Use your ears and experiment; you will hear exactly what I am talking about. Figure 3 shows the average final product.
Polishing the Edges and Exporting.

Figure 5
The next step is to export out each individual piece of a live performance or classroom recording. Though our newly found EQ techniques will help here, there is still a difference in the room sound and silence. In order to get rid of this, I use a fade in and out technique.
For the beginning of a take, start one second before the first sound and fade in from silence to right before the start of the waveform, as shown in Figure 5.

Figure 6
With a little EQ to fix the room and proper track exports your recordings will sound much more polished. In the next installment of this series, we will cover advanced EQ techniques, multi-track recording, and how to record performance takes and edit them together.


