

How to Enhance a Percussionist’s True Movement Potential
 I joke with my students all the time that we live in a “ppht” world, meaning that the time we actually get to interact with our instrument is extremely limited. I say this with a smile, but unfortunately it’s the truth. My motto is that because the time we actually get to connect with our sound is so short, we have to maximize that effort, and maximize it at a very minute level. In that small window we essentially have to be at our best.
Being our “best” means being able to choose our movements. Most players will agree that percussionists move or use three main “areas,” as I’ll call them, when we play: the elbow/forearm, the wrist, and the fingers. Watch any great performer and you’ll realize that during any given performance they engage all of those areas to some degree (and a multitude of combinations, too), depending on the sound and/or articulation desired.
We need to have 100 percent flexibility with all areas in order to take advantage of them when and if we consciously choose to. Unfortunately, most young percussionists default to one or at most two, but not all three. They do this because they aren’t comfortable moving all equally. Why is that? Because they haven’t really thought about or trained all three to be limber or truly flexible participants in their stroke. Through this reasoning, it makes sense to practice a series of exercises that will help work the maximum movement in each area, so that when and if they choose to utilize it, it’s comfortable enough to move freely.
I use the following exercises with all of my students (as I did when retraining my technique as a DMA student) and I’ve had fantastic success. It’s not that your students will use each area equally all the time, but when needed, they’ll be able to do what they wish because they’ll be comfortable doing so.
The following is an exercise I’ve referenced in a past article, but now we’ll use it in a different way. Again I’d like to credit my old teacher, Erik Forrester, associate professor emeritus at the University of Southern California’s Thornton School of Music, for these exercises and technique approach. It was under his tutelage that I learned so much that changed the way I play and teach.
What follows is what we’ll call Example A, from a page of exercises called “Muscle Looseners & Warm-ups.” It’s essentially just sticking variations but it works on quite a few things. For the purpose of this article we’ll utilize it as a practice tool for the way we’ll work on your percussionists’ “areas.” (Page five from the book Stick Control for the Snare Drummer by George L. Stone works well here, too.)

A very special note – when discussing how we play any exercise in order to work each area, it is important to remember to only change what is needed, nothing more. I often find that students, while doing the alternate approach, change other parts of their playing although they don’t need to and weren’t told to. Why? I’m beginning to chalk it up to human nature, but it’s vital that we stay true to our normal playing approach regarding quality of sound, beating spot on the drum/practice pad, trajectory of the stick, not rolling over forearms so that thumbs end up on top of the stick, and so on.
To aid with this I find it helpful to have my students always start by placing their sticks on the pad/drum like they are about to play normally, and only then move on to each altered approach below. It’s a great way to have them check back to their normal technique and helps students avoid altering more than they have to when practicing these exercises.
In general, we will do the following three things:
- Use what I’ll call the Back of Hand (BOH) – just the ring and pinky fingers holding the stick.
- Use what I’ll call a “Balanced” or “Middle” of hand – all fingers lightly touching the stick without anything coming off the stick while playing.
- Use what I’ll call Front or Fingers (loose fulcrum) – just the fingers/fulcrum/front of hand only when playing.
The breakdown of movement is as follows:
BOH – forces us to use just forearm motion – pumping the elbow
Balanced or Middle – forces us to use just wrist motion
Front or Fingers – forces us to use just finger motion
The combination of these exercises forces the different areas to activate, and then be incorporated naturally and subconsciously into stroke movement. This is achieved by essentially altering our grip on the sticks in these three unique ways. So how do we actually do that?
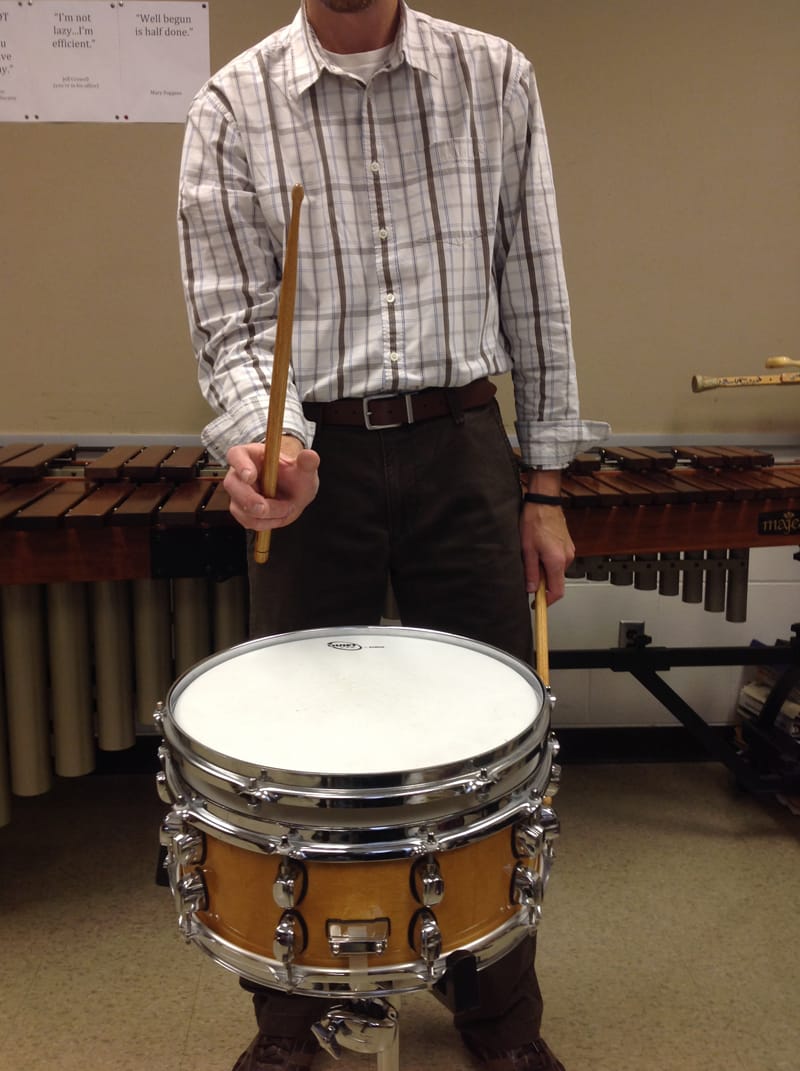
Back of Hand

Gripping the stick with the back of the hand only.

Gripping the stick with the back of the hand only.
Looking at the examples, you’ll see how I’ve released my thumb, index, and middle fingers from holding the stick at all. This forces our ring and pinky fingers to support/hold the stick. You’ll want to make sure your students aren’t spreading their front fingers away from the stick too far, but keeping them just off. I find it helpful to add a slight bit of pressure with my back fingers, so that the stick can still move a little bit naturally when I shake my fingers up and down, but only a little.
You can’t use a normal fulcrum because it’s not there. You can’t really move your ring and pinky as a fulcrum because that’s not how we normally use them. Moving your wrist feels awkward, so the only option left is to move that elbow. As your students practice this, make sure that they are not letting their wrist engage at all. You might see a hint of it; prevent it from happening. The goal of BOH is to only use the elbow, so as students practice, make sure they are using just that elbow or what I call a forearm pump. You want full use of your elbow? This is how you do it. Remember to have your students strive for the same kind of sound they normally get when playing, just with an altered technique. It’s helpful to have them begin and end the stroke up.
Middle or Balanced

Gripping the stick with all of the fingers at once.
 A word of caution here is that many students will still want to let the stick come out of their hand a little at the back of their palm, letting their normal fulcrum kick in a bit. Don’t let them. They have to hold the stick lightly in their hands so as to maximize wrist motion. I find that telling them the stick really pivots with their hand is a helpful reference. Trust me, it’s weird, but it definitely works their wrist and is a great way to force them to learn a good touch on the instrument. Remember, we’re striving for the same sound we get when we play normally, so if you need to have them play some strokes in a normal fashion as a sonic reference and then have them try this approach, by all means do.
Front or Fingers

Gripping the stick with only the front fingers.
Have your students put the stick down in their weak hand. Then, have them place their strong hand with the stick on the drum or pad, like for normal playing. Now, using the weak hand to do the moving, have them lift the stick up to almost the vertical position with their strong hand, only allowing for that movement in their fulcrum (the point where the stick pivots in their fingers), don’t allow them to move anything else. Then, while only adding enough pressure in that fulcrum to keep the stick from falling, take the weak hand away. We are really just using the weak hand to lift the stick up and allow almost zero movement in the strong hand.
 During this exercise, it’s imperative that the stick begins and ends up this high. Now, without moving the elbow (normally not a problem here) or wrist (normally a huge tendency here), have them fire that stick down towards the head and back up to the starting position once using only their fingers. This approach is normally the hardest for student, but that’s good. Why? Because it means the fulcrum isn’t functioning as well as it could and this exercise will help that. It will take some practice, but they’ll eventually get the hang of it. Remember, have students watch their playing to make sure that wrist isn’t moving. Start with single finger strokes first. Only after feeling comfortable should they try several in a row. Here’s a slightly underneath view to see how the fingers should look.
Often, students’ thumbs will roll over on top of the stick or the stick will slide or slip downward in their hand a bit. We cure the first by starting in that normal playing position to remind us how we should have our arm/wrist/hand as a reference and then not to change it. The second issue is helped by practicing and finding just the right amount of pressure we have to have in that fulcrum in order to keep the stick from dropping down (it’s dropping because there’s not enough pressure in their fulcrum). It doesn’t actually require much pressure, but finding that balance is tough.
Putting It All Together
Once your student has a grasp of each approach, you can then have them practice each stroke by using the following practice routine:
Ex. A – 8x Normal
Ex. A – 8x BOH
Ex. A – 8x Middle
Ex. A – 8x Fingers
Ex. A – 8x Normal
As your students practice this, you want to set a tempo for the quarter note that’s slow enough to allow them to physically digest each stroke and how it’s being generated, but fast enough where each stroke goes from one to the next, with no discernible stop in between each note. I find it easiest to set the metronome for the eighth-note and then use that as the guide since at this slower tempo the quarter note pulse per minute can be quite slow. Experiment and see what works best for them.
We want to make sure to use this exercise to not only force the single “area” to do all the work but to also reinforce some things that are key to our playing. So, as students are working on keeping their practice similar to their normal playing, they should remember to keep all the strokes the same and strive for equality with every note. If you want the strokes to sound the same, you need to play them same – it’s just that simple. Be careful to monitor the students’ strokes and have them utilize the piston or full-rebound motion when playing each note. By doing this, they will be working on the maximum effort potential for each stroke. With this approach, they’ll be comfortable with the maximum movement they might need, and can then taper down to less movement as needed from that point. It’s always easier to do less than to do more!
Remember, it’s simple. And simple things make a difference because what we do is based upon the mastery of simple movements. But because it’s simple means it’s harder to stay focused while doing it, so constantly remind them what a big difference it will make. The more students see and hear themselves change, the more they’ll practice it. But those initial stages of keeping them engaged and dedicated until they see results with this approach are the hardest. Be diligent – it’s worth it. And if it’s hard at first, good! That means when they gain the control, they will have accomplished something they couldn’t do before, and they will have grown as a player.
 Dr. Jeffery Crowell is an associate professor of Music at the University of Wisconsin-Eau Claire, where he is the director of Percussion Studies, as well as assistant director of the award-winning Jazz Studies area. He is active throughout the United States as a performer, clinician, adjudicator, and educator with performances in South Africa, Argentina, Uruguay, and at the John F. Kennedy Center for the Performing Arts in Washington, D.C. Dr. Crowell is also a member of the Percussive Arts Society’s Education Committee.


